Fan Control of CPU, GPU, Mainboard and AIO Fans
Preface
Posted July 9, 2021
Many users test or use Argus Monitor because they are looking for the best fan control program. Is Argus Monitor the best fan control program? In our opinion, there is no 'best software' for this purpose. Other programs are cheaper
(or even free), but either offer only limited functionality or are much more difficult to configure. We try to find a compromise to allow maximum flexibility in fan control with a user interface that is as intuitive as possible.
Even if we try to make everything in the program as self-explanatory as possible, this is not always possible in the context of tooltips and short texts. Therefore we provide this manual in order to describe Argus Monitor's fan control options in more detail if required.
Suggestions and improvements are of course always welcome, even if we are not always able to implement every wish.
General information
With Argus Monitor you have the possibility to control the speed of the housing and CPU fans installed in your PC depending on various temperature sources. Furthermore, it is possible to control the graphic card fans depending on the graphic card temperature.
It is also possible to manually set the fan speeds to fixed values.
The control is only active as long as Argus Monitor is running. After exiting Argus Monitor, the values that were active when the program was started are restored (in general, this should be the control via the BIOS).
For both GPU fans and fans connected to the mainboard, you can specify separately whether the fan control settings should be activated automatically the next time the program is started.
The 30-day trial version offers the full range of functions, i.e. there are no restrictions regarding supported hardware or temperature sources. If you want to use our program for fan control, we recommend to test it extensively within the test period, whether it meets your expectations.
Prerequisites
The prerequisite for using the fan control is that your hardware is supported by Argus Monitor. This is the case for almost all mainboards and graphics cards, but individual channels may not be controllable. This is due either to the design of the mainboard by the mainboard manufacturer or to the monitoring chip used on the mainboard.
It is not advisable to use other software for fan control at the same time, as the fan ducts are an exclusive resource that can only be controlled by one program at a time.
The control of fans on notebooks is generally problematic (with the exception of most Thinkpad models from Lenovo), as these rarely allow external access to the fan control.
Argus Monitor supports many monitoring chips of the well-known manufacturers ITE, Winbond, Fintek, Nuvoton and SMSC.
All values available within Argus Monitor can be used as temperature sources:
- CPU temperature
- GPU temperature
- Temperature channels of the SuperIO monitoring chip(s)
- Hard disk/SSD temperatures
GPU fan control
The graphics card fan can be controlled via the 'GPU' page. With the checkbox Set last setting at startup you can specify that the settings made should be automatically applied each time Argus Monitor is started.
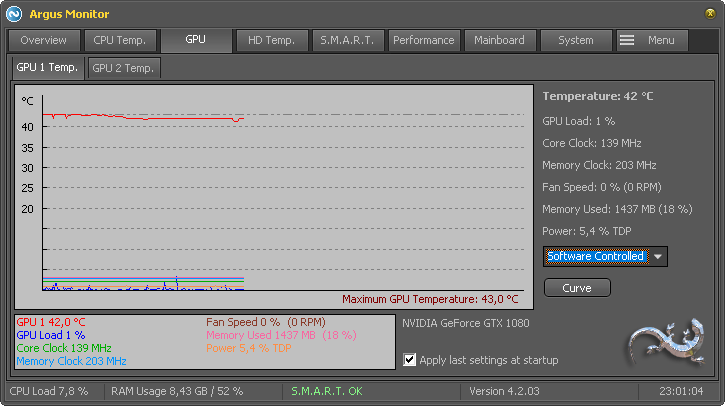
Overview page GPU with controller for GPU fans
Manual control at constant speed
If you want to operate the fan of the graphics card at a fixed speed, select Manual mode as controller, set the slider to the desired control value and press the Apply button.
Control GPU fan dependent on GPU temperature
To control the graphics card fan based on the GPU temperature, you must define a characteristic curve that determines which fan speed should be set for which temperature. To do this, select Software controlled as the controller and then configure the desired characteristic via the Curve button.
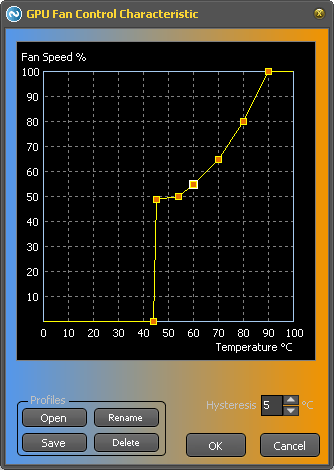
Controller characteristic curve for GPU fan controller
In the configuration dialog for the characteristic curves, you can save and reload various characteristic curves.
A more detailed description of the function of the characteristic curve can be found below in the description of the control of fans connected to the mainboard.
Control of chassis and CPU fans
The settings for the control of case and CPU fans are made via the 'Mainboard' page on the bottom Fan Control.
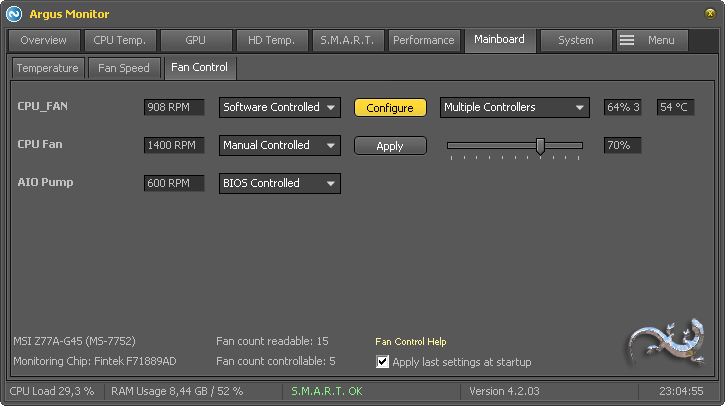
Settings for fan control of the mainboard fans
With the checkbox Set last setting at startup you can specify that the settings made should be applied automatically each time Argus Monitor is started.
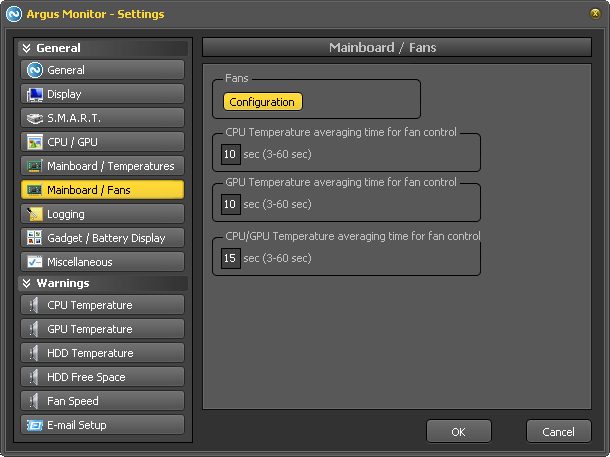
Initial configuration
Before using fan control for the first time, you should adjust the temperature sources and fan channels to your hardware and your needs once. In this step you can name temperature sources and fan channels and define which sensors and fans appear in the user interface. This step cannot be performed automatically by Argus Monitor because neither the assignment of the temperature sensors nor that of the fan channels is standardized and depends on the motherboard used.
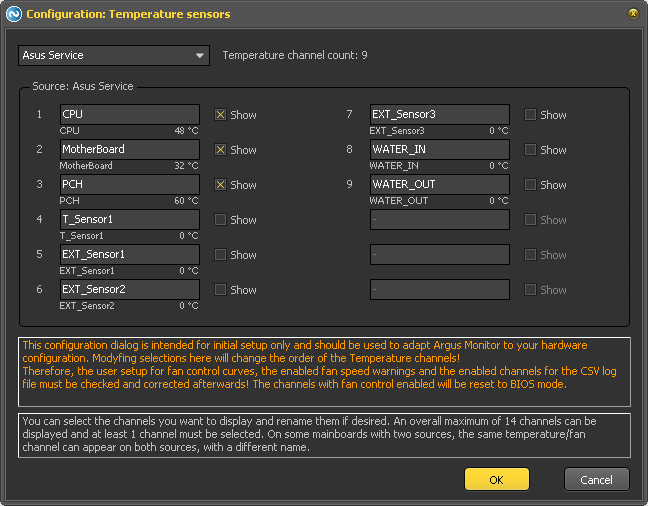
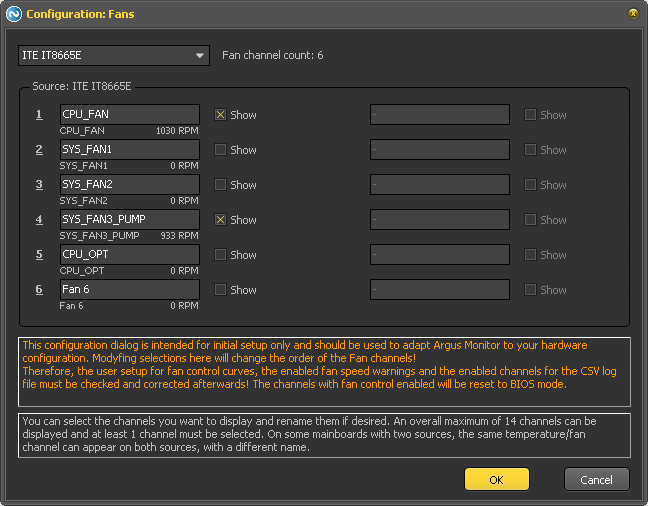
Configuration dialog for configuring the temperature channels
The picture shows the configuration dialog for selecting the temperature channels of one source (SuperIO monitoring chip, AIO liquid cooler, power supply, ...). Using the dropdown menu in the top left of this dialog you can select the source you want to configure. You reach this dialog in the settings in the category Mainboard / Temperatures by pressing the button Configuration.
Use the Show checkboxes to specify which of the channels Argus Monitor should use. You can use the text boxes to assign an individual name to each channel. The current measured value is displayed below the name to indicate to which of the channels a temperature sensor is connected. A selection of up to 14 channels is possible. Especially on mainboards with several independent temperature sources, individual temperature sensors are often connected to both sources and additionally to several temperature channels.
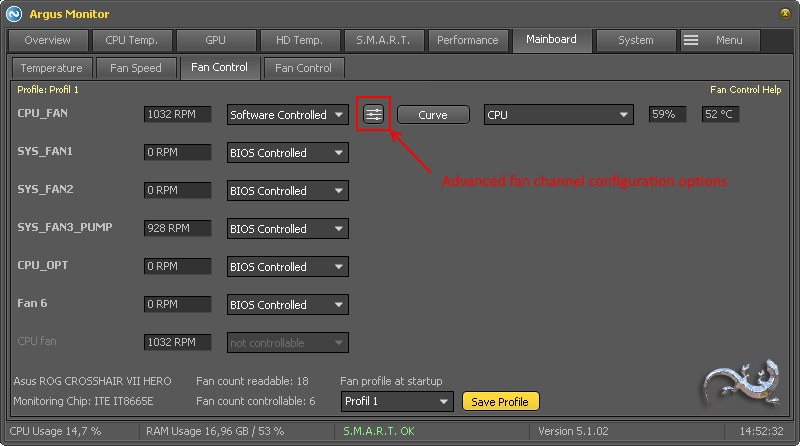
Configuration dialog for configuring the fan channels
Analogous to the configuration of the temperature channels, the fan configuration can be adapted in this dialog. You reach this dialog in the settings in the category Mainboard / Fans by pressing the button Configuration.
The currently measured speed is displayed below the individually configurable name. Up to 14 fans can be selected for use in Argus Monitor by setting the checkboxes labeled Show.
Analogous to the situation with the temperatures, it is also valid with the fans that its values could be available both at both sources and parallel at several channels if necessary. The speed values under the name should change then in agreement, whereby however not necessarily the exact same speed value is measured. In such cases you should at least select the channel for which a control is possible (unfortunately this can only be found out by trying it out) if you need a control for this fan.
Advanced fan channel configuration options
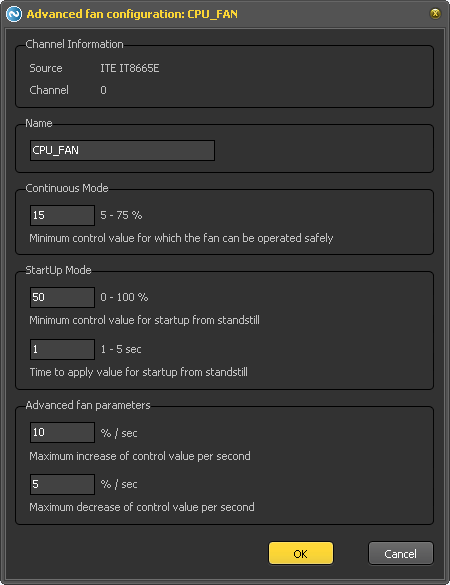
Dialog for setting advanced fan configuration options
Every fan channel offers some advanced option you can configure. The details are described below. The advanced options can be configured b clicking the button shown in the image above. This button is only visible if fan control for this channes is either in Manual or Software mode.
You can also use this dialog to assign a new name to the fan if desired.
Configuration of the minimum permissible output value and the starting behaviour for fan control
In the configuration dialog for the advanced fan channel options (see image below), the minimum permissible output value and the startup behaviour can be individually configured for each of the fans.
Dialog for setting advanced fan configuration options
Except for a few PWM-controlled fans, there is a 'forbidden' range for all fans in which they cannot be controlled safely. For security reasons Argus Monitor uses a default setting of 40%. With the option Minimum control value, from which the fan can be operated safely you can set the smallest permissible value, with which the fans can still be controlled safely. A control value of 0% is always possible regardless of this setting, in order to switch off the fans completely if required (some PWM-controlled fans, however, still prevent the complete switch-off of the fan internally).
Configuration of individual values for fan start from standstill
Most fans allow to be brought to a complete standstill by appropriate control. However, as a rule, the minimum permissible value set with the option Minimum control value above which the fan can be safely operated for normal operation is not sufficient to restart the fan safely from standstill. For this reason Argus Monitor controls the fans for a short time with a higher value to ensure a safe start. The default value for this is two seconds and 60% to ensure a safe start in any case. With very fast reacting fans, however, this value can be too high and lead to an audible start with a short-term high speed. In these cases you can individually configure a different value for each fan channel. Two independent parameters can be set for this. With the option Minimum output value for safe starting from standstill. you define the value with which the fan is operated for starting from standstill and with the option Time duration for safe starting from standstill. you determine the time duration with which this happens.
Rate limit for fan control output value
To prevent sudden spikes in fan control output you can configure the maximum change of fan speed per second. The configuration can be done dependent on if the new control value is be smaller or bigger than the last one. The default values still allow pretty responsive fan control.
Available methods for fan control
Manual control at constant speed
Dialog for configuration of fan control
If you want to operate a channel temperature-independently at constant speed, select Manual mode as controller for the corresponding channel, set the desired control value with the slider and confirm with the button Apply.
Control as a function of one or more temperature sources
To control a fan based on one or more temperature sources, first select Software controlled as the controller type for the fan channel. Then select the temperature source according to which the speed is to be determined. The following temperature sources are available:
- CPU temperature (the maximum value of all CPU core temperatures)
- GPU temperature
- Combined/Medium CPU and GPU Temperatures
- Temperatures of all selected temperature channels of the available monitoring chips
- SSD/hard disk temperatures
Both the CPU temperature and the GPU temperature can also be used as an average value over an adjustable period of time.
In addition, various combinations of temperature sources are available:
- avg. (CPU, GPU)
- max. (CPU, GPU)
- avg. (CPU, GPU), filtered over [m] sec
- max. (CPU, GPU), filtered over [n] sec
- max. HDD/SSD temperature of all internal HDDs/SSDs
- Multiple Controllers
The determination of the combined temperature value for each of the options is calculated as follows:
- Arithmetic mean value of CPU and GPU temperature: (T_cpu + T_gpu) / 2
- Maximum value of CPU and GPU temperature: max(T_cpu, T_gpu)
- The moving average value from 1) over a period of a total of [m] seconds (sum of all measured values by number of measured values)
- The moving average value of 3) over a period of a total of [n] seconds (sum of all measured values by the number of measured values).
- Advanced Advanced option for advanced users that calculates up to four independent controls from any four sources (see below for a description of how to use them)
Dialogue to specify the times for averaging temperatures
The desired time for averaging the temperatures provided for fan control can be adjusted in the settings.
Characteristic curve based control
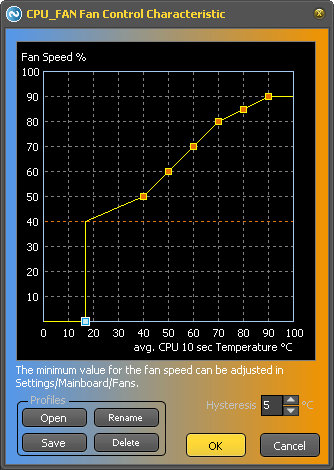
Controller characteristic curve for fans connected to the mainboard
All controllers are based on characteristic curves which determine the relationship between the temperature of the selected temperature source (see last section) and the control value for the associated fan duct. The characteristic curve itself is defined by moving the control points (either with the mouse or with the keyboard using TAB/Cursor keys). If the first control point is moved all the way down, the fan only becomes active at this temperature and remains completely switched off for all lower temperatures.
The minimum permissible PWM value can be specified in the Argus Monitor settings (see above). This defines the range in which the fan cannot be reliably operated. The controller then ensures that the fan is either switched off completely or is operated with at least the specified minimum PWM value. An additional hysteresis allows to ignore fluctuations of the temperature by a certain amount, in order not to cause an audible reaction of the fan with every small temperature fluctuation, especially with steep characteristic curves.
Extended fan control through combination of several controllers
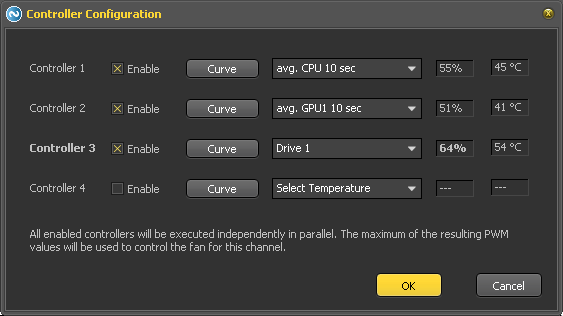
Dialog for the configuration of the multiple controllers
For special requirements, it is also possible to determine the speed of a fan duct using a combination of up to four individual controllers. To do this, first select Software controlled as the controller type and then Multiple controller from the list of temperature sources. With the button Configure the dialog for setting up the multiple controllers can be opened.
Up to four independently calculated controllers can be defined here - analogous to setting up a single controller. Each of these controllers can have its own temperature source and characteristic curve. All controllers marked in this dialog as activated run independently and each calculate its own manipulated variable. The maximum value is then used to control the associated fan.
AIO liquid coolers
Argus Monitor can control most Corsair and NZXT liquid CPU coolers as well as fan control boards compatible with Corsair CommanderPro.
Not all options of those controllers are available at the moment. What should be possible is the readout of liquid coolant temperature as well as pump/fan monitoring and pump/fan speed control. What is not available is RGB light control if the cooler has RGB lights. We might add RGB light control at a later date if we get enough feedback from Corsair users that this is a desired feature.
Controlling those devices only works if the system service 'CorsairService' and it's associated program iCUE is not running, otherwise Argus Monitor can't safely access the device. The same goes for the software NZXT CAM, which also must not be active in order for Argus Monitor to access the devices.
Different types of fan connections
The following diagrams show various ways to connect fans to PC mainboards, as well as explanations of what this means for their controllability.
Usually you will find information about which fans are supported by your motherboard and how to connect them in the mainboard user manual.
Argus Monitor as application software has no possibility to read out the wiring of the fans used on a certain mainboard via software.
However, as long as the correct fan is installed (a fan with 3-pin or 4-pin connector) or the connected fan is set correctly in the BIOS, Argus Monitor can control both voltage-controlled and PWM-controlled fans and change their speed if a supported SuperIO chip is present.
The following diagrams show different wiring variants for each fan channel of the SuperIO chip.
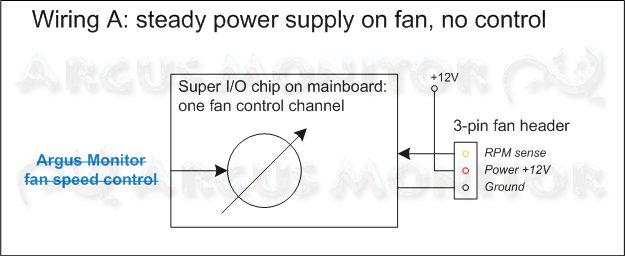
Variant A) 3-pin fan connector, power supply directly from power supply unit
Wiring A shows a wiring where the mainboard vendor decided against adjusting the fan speed for this fan header. The middle pin on the fan header, which is responsible for supplying the power to the fan, is wired straight to the 12 Volts power supply, so there is no way to control the fan speed via the Super-I/O chip. Only the RPM fan speed can be monitored. Obviously, neither Argus Monitor nor any other software can control such fans.
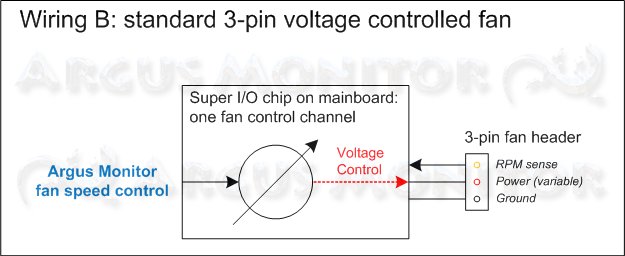
Variant B) Standard wiring for voltage-controlled 3-pin fan
Wiring B shows the wiring for connecting a standard 3-pin fan which can be voltage controlled. The Super-I/O chip can vary the voltage on the middle pin of the fan header to change the fan speed. Argus Monitor can control such fans.
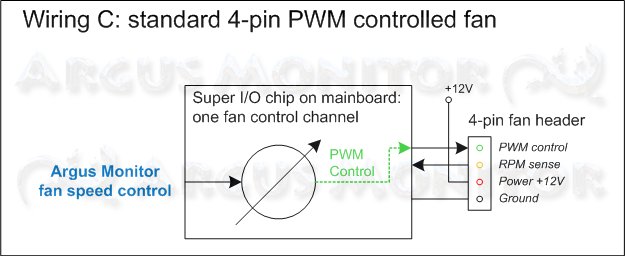
Variant C) Standard wiring for 3-pin fan with PWM control
Wiring C shows the wiring for connecting a standard 4-pin PWM controlled fan. The fan is powered with a constant 12 Volts supply and the Super-I/O chip can vary the duty rate of the PWM frequency to change the fan speed. Argus Monitor can control such fans. One could also connect a 3-pin fan to the 4-pin header, in this case the fan would run at the 12 Volts rated speed only without the opportunity to control it.
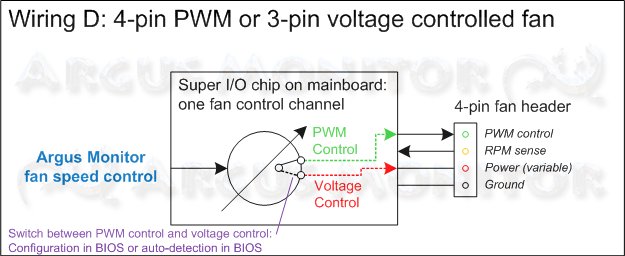
Variant D) 4-pin PWM fan or voltage-controlled 3-pin fan
Wiring D is the most advanced fan connection layout on a mainboard. The user has the possibility to connect either a 3-pin or a 4-pin fan. Both fan types can be controlled. The switching between the voltage control for the 3-pin fan and the PWM control for the 4-pin fan is done by the BIOS, either with such a configuration option or with an auto-detection method. Argus Monitor can control such fans.
Fan control with Argus Monitor is available for wiring variants B, C and D.